Orange Basbousa | Eggless Semolina Cake


Orange Basbousa


Basbousa can be best described as a dessert of Middle Eastern origin. Yes it is a dessert from a desert. It has variations in each country, especially those near the Mediterranean region and i have attempted to create a recipe of my own by making some variations in the syrup rather than in the cake itself.

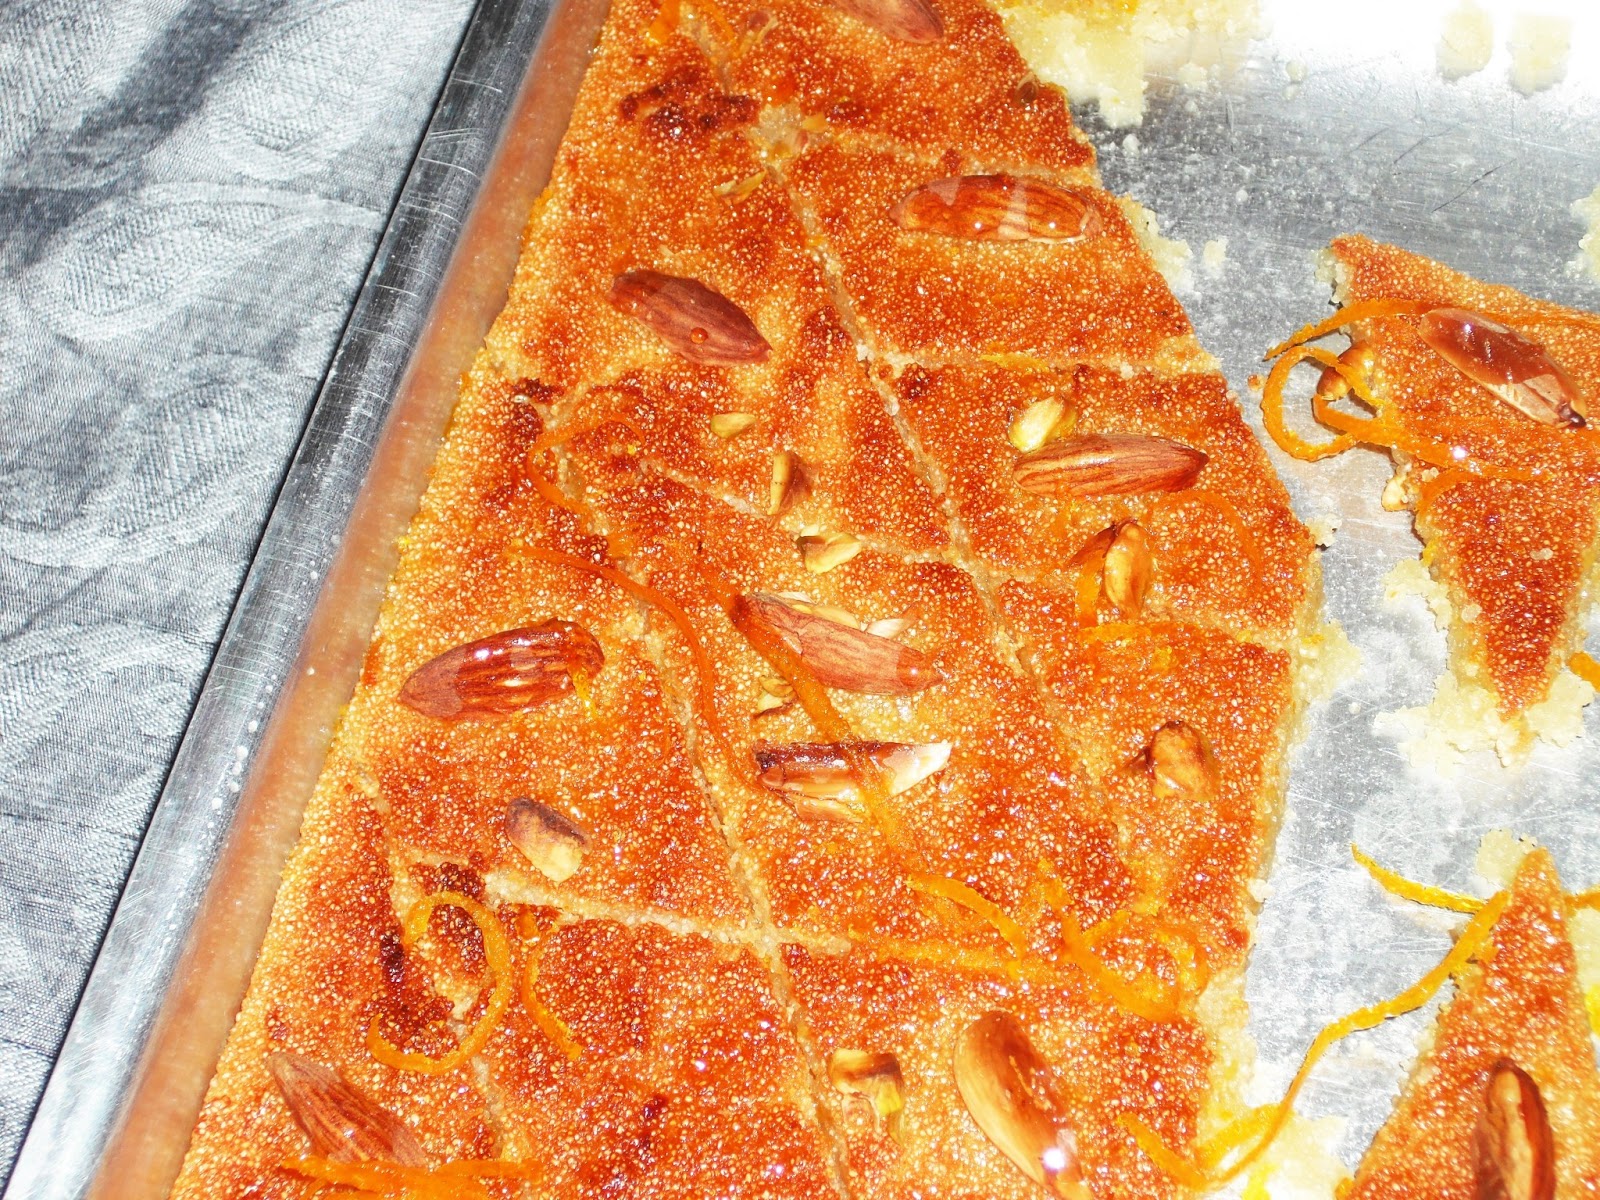
This is my second attempt at baking a semolina cake. The first one was a Turkish Pistachio semolina cake. It tasted good but since i reduced the quantity of egg, it was not that soft. So i decided not to change the basbousa recipe and followed the ratio. Since this is the first attempt at basbousa i tried with small portions. The actual syrup recipe has sugar and few drops of lime. But for the syrup i followed the syrup in the Turkish recipe. This is one of the desserts i would call it 'divine'. Sorry for the bad picture above.....i was in a hurry and couldn't make it good diamond shapes, i should have at least cut in squares...


You can keep a ratio of the ingredients, so that you need not write down the recipe all the time. Here the ratio is 200 gms of semolina (rava), 200 gm sugar (in total) and 200 ml liquid (yogurt + oil), 200 mls syrup (100 ml orange juice and 100ml water) ...isnt that easy..

the recipe

ingredients for the cake

fine semolina - 200 gms (you can blend regular rava / semolina in mixie for 5 seconds)
caster sugar - 100 gms
Yogurt  - 100 ml
Vegetable oil - 100 ml (the orginal recipe has 100 gm melted butter)
Vanilla extract - 1 tsp
Baking powder - 3/4 tsp
Rind of 1 orange (optional)
Almonds and pistachios - 1 for each piece

for the syrup

sugar - 100
fresh orange juice - 100 ml
water - 100 ml
rosewater (optional) - 3 drops
Rind of 1 orange

the method

Place the sugar, yogurt, vegetable oil, vanilla and rind of orange in a bowl and mix well until the sugar is fully dissolved. Add the semolina and baking powder and mix well with a spoon or your hand. The mixture will be slightly water. Leave it aside for 30 minutes.

Meanwhile, place all the ingredients for the syrup in a saucepan and bring it to a boil in medium heat. Let it boil for 5 minutes. Turn off heat and let it cool.

Grease a baking tray with butter or oil. Once the semolina mixture has rested for 30 minutes, give a quick mix again and place it in the baking tray and smoothen the top to level it. Cut it into desired shape and place the alomonds on each piece. I sprinkled the pistachios. Bake it at 180C for 30 - 35 minutes until the top of the cake turns golden brown.

Take it out of the oven. Pour the cool syrup on the hot cake. Serve warm. You'll love it. This is totally different from the Indian sooji ka halwa aka Rava Kesari


Rava Kesari


Ribbon Pasta in Mushroom Sauce | Indian Home Style Recipe


Hello everybody, It has been a long time that i wrote a recipe. Well my passion for blogging has not gone, but i just hit a roadblock in terms of writing at my blog, may be because i am writing a lot for my work related contents and i am just off here...i had been taking pictures...a lot of pictures...and i almost forget the recipe. So today i prepared this pasta for brunch....it was actually for breakfast...but the rain in Kochi is making everyone hungry i suppose, kids were around saying the word hungry..oops....i have not heard them say it before and i felt ... i better give them something...at least i can keep them away from my kitchen. So the breakfast was stretched to brunch and i think i cant escape without cooking a lunch too...

I have mentioned in the name of this recipe that it is Indian style. It means, i am not going to add cheese and i am adding milk instead of cream. However in terms of the herbs, i have added fresh basil and rosemary. These are now available in the newly opened Lulu Mall at their hypermarket. However the basil is from my balcony garden. If you cant find fresh rosemary, use dried rosemary. You can find it among dried herbs in supermarket. Two brands which i have used and which i have stocked at home are the ones from Keya and the organic product from Fab India. In Kochi, all these mediterranean herbs are found in a dried format in a shop called Bakers which is adjacent to Padam Cinema Theatre on M.G.Road. The dried ones are also strong enough to impart a nice flavour to the sauce. 

Though i cook a lot of Italian, i have written only a few of them in my blog. So i have decided to post a few more since types of pasta are now available in supermarkets in all parts of the city. Bambino has now come out with Penne pasta, Ribbon pasta, Spaghetti in addition to Macroni and Vermicelli which has already been in the market. Ok then ...so these are the brands and shops from where you can buy all the ingredients. If you want to know how to grow basil in tropical climate, do let me know. This is the basil in my balcony garden.


the recipe 

One 200 gm packet Ribbon Pasta

ingredients for the sauce

One pack Button Mushroom, thinly sliced - Check out below how to clean mushrooms

2 tablespoon vegetable oil (you can add a teaspoon of butter also if you wish)
2 medium onion, sliced
5 cloves of garlic, finely chopped or minced.
1 1/2 to 2 tsp pepper powder
8 cherry tomato or 1 tomato cut into 8 (i have used the latter)
150 ml milk
salt to taste
6-8 basil leaves
a tiny sprig of rosemary (optional)

Method

The sauce and the pasta has to be cooked simultaneously to ensure the continuity of the cooking of pasta.

I  Cook pasta as directed in the packet. But cook only 3/4th of the time, because the rest 1/4th time, the pasta has to cook in the sauce to get that nice consistency and flavour.

II In a wide pan, heat oil and add the onion and garlic. Stir it in low heat till translucent. Add the thinly mushrooms and continue sauteing in low heat. Add 1 1/2 tsp pepper. By this time, the pasta would have completed 3/4th of its cooking time. Drain water from pasta and add it to the sauce (reserve a little bit of the liquid). Gently toss the pan or gently stir it with the sauce. Let it cook for 2 minute. Add salt. Now add the tomato, basil, rosemary and milk and continue to cook in low flame until the sauce is thick. If there is no adequate sauce to cook the pasta add the liquid which has been reserved. Check the consistency and tasty and also if pasta is cooked to soft but not too soft texture and turn off heat. Serve immediately.

How to clean mushrooms

Sprinkle vinegar on the mushroom and sprinkly maida / flour over it. Ensure the mushroom is fully covered with this mix. Let it so for 10 - 15 minutes. Gently rub the top of the mushroom and peel the skin. Start peeling from the bottom of the umbrella. I did not use the stem, because it was hard.

Hope you enjoyed the recipe and all the details...

cheers!!

The recipe goes to My Bowl of Pasta hosted by Jagruti


Egg Hoppers | Mutta Velleppam


Egg hoppers are more identified with Srilanka than Kerala, I think. Even in Kochi, it is not common in a restaurant menu that reads out a mutta velleppam / appam. Recently, i saw the TV series - My Srilanka with Peter Kuruvita. The batter prepared for appam is slightly different from mine. In the TV series bread is used instead of yeast. Mine has even more difference. I don't use the coconut milk version. I follow the recipe where coconut is ground along with rice. This is much easier because there is no task of extracting the coconut milk and then cleaning up many vessels. The secret of my recipe is the addition of coconut water. Egg hoppers have crispier edges than usual hoppers because the egg is poured into the cooked palappam otherwise the middle of the appam will remain undercooked or even uncooked and messy. 


The rule of thumb therefore is to break the eggs in when the appam is almost cooked. Sprinkling salt and pepper is optional, but i prefer it, as it gives more taste.


recipe for egg hoppers or mutta appam

appam batter (click here for recipe) - as much as you need

eggs - 1 per appam  / hopper

Heat a deep pan, as seen in the first picture. Grease it with oil cloth or just use back of a spoon to spread 1 or 2 drops of oil. Pour a ladleful of appam batter. Swirl the pan to let the batter coat the pan. For egg hoppers make sure there is not much batter to collect in the middle. Put the lid on and cook in medium heat. This ensures that the sides are still soft. Once the middle the appam has lost its whitish colour or has turned pale, break an egg in. Sprinkle some salt and pepper ( i rubbed together a tiny pinch of salt and a tiny pinch of pepper in advance, so that it is evenly spread on the egg). Cover and let the egg cook in low heat. Low heat is required to cook this step, so that the sides do not turn dark brown. Remove the egg hoppers from the pan when the eggwhite is completely cooked and the egg yolk is slightly gooey. It will cook itself by the time it is served. Serve with a bean curry, like garbanzo bean curry / kadala curry (masala curry) or green peas green kurma or  a vegetable kurma.

Neyyappam

Neyyappam


Neyyappam is Kerala's own rice pancake deep fried in ghee. It can be compared to the North Indian deep fried pancakes called Malpua . I thought that it is intricate and difficult to prepare Neyyappam at home, but it is not. It is very easy as long as you have a dependable recipe and all the ingredients. I did a detailed research about Neyyappam before trying it, 'coz none of the photographs i saw online had the texture and colour of what i have seen in the ones we buy from store. And also because this is not a family recipe, just my trial to check whether i can be successful with it. 

If any of you who have a traditional recipe for Neyyappam, do let me know whether cardamom and dry ginger is added. Because the taste i have known does not have cardamom or any other flavourings, so i have left out in my recipe, but if you feel like you can add it. The measures of cardamom and ginger is given here on the basis of a similar Anglo-Indian snack called Soulinjha which we prepare during Christmas season.


ingredients for the recipe

rice flour (puttu podi)  - 2 cup (200 gms)
jaggery, grated - 2 cups (approx 175 - 200 gms)
plantain (palayamkodan) - 2 or banana - 1
water to crumble the rice flour - 100 ml
water to melt the jaggery - 100 ml
butter or ghee - 1 tbsp
coconut bits - 2 tbsp (cut thin slices of coconut and dice it into 1.5 cm pieces)
sesame seeds - 1tsp
oil for deep frying

Though the name literally means made of ghee, i have used vegetable oil for frying. Use a flat bottom pan to fry the neyyappam as seen in the picture below.


Neyyappam being fried

Place the rice flour in a deep bowl. Add the water and crumble it as done for puttu or for a pastry dough. Keep it aside for one hour. Mash the plantains and place it in the rice crumble. Add the butter. Knead it into a smooth dough. 

Heat water and melt the jaggery. Let it cool down to room temperature. Add one third of the syrup into the rice mix. Start mixing with your hands or a whisk. I mixed with hands. Get rid of all the lumps and mix till you get a smooth batter. Add the remaining two thirds of jaggery and mix well.

Fry the coconut bits in ghee or oil and add it to the batter. Wash the sesame seeds 2 to 3 times and add it to the batter. Let the batter rest for 5 hours or overnight. It would have become a thick batter now, but it will be in pouring consistency. 

If you like to add cardamon , powder 3 cardamoms and add to the batter at this stage. Additional spice is dry ginger. You can powder 1/4 inch piece and add to the batter alongwith cardamom.

Heat adequate ghee or oil in a pan. Use a small ladle to pour the batter. Or else you can use a spoon from which you can pour the batter in one direct stream. When the bottom of the neyyappam is cooked it will leave the pan by itself, otherwise you can slightly loosen it once the sides start turning brown. As you see in the picture , the first set i fried is the blacking brown colour, since i was not aware of the cooking time. So you can test with one and then repeat the frying process.  Switch heat between high to medium or even to low while frying Neyyappam.

This can be stored for a week or two in air tight containers.

Enjoy!


Bread Pori - lettes


If there can be cakelettes and tartlets, why not some pori-lettes. Pori is nothing but the shot form of porichathu. In Kerala, we have our own, famous pazham pori and undampori. Similarly in rustic tea shops and some city tea shops you can find bread porichathu - a Mildly Sweet, Batter fried bread. But the one you get in the tea shop is a whole slice of bread, which has very little crispy sides. What i like in a snack is the crisp and crunch. When i used to eat undampori  served in our college hostel, i used to peel off that brown coat like crispy side and leave a table tennis sized inside of the undampori in my plate. I hate to waste food, but i just couldn't afford to eat the uninteresting inside. So, the undampori's i prepare is also small. Maybe i should start calling it undampori - lettes .....

The miniature sized bread pori's as you see in the picture is as a result of my fondness for that crispy edges and crunchy sound you get with every bite. Kids would just love to see these tiny snacks. It is easy for them to pop in one, run around and pick another one. You need not hold that one huge slice of bread pori and think when is this going to finish.

This recipe is good to use up left over bread slices, which are a day or two old.


Recipe for bread porichathu

Bread
Oil for frying

ingredients for the batter

5 tbsp flour / maida

1 1/2 tbsp rice flour (this gives the crisp & crunch) - its fine, even if  u don't have rice flour - just add soda instead of water to prepare the batter or you can just skip this ingredient and add the same quantity maida

1/4 tsp or a little less salt

2 tbsp sugar

1 or 2 tbsp sesame seeds - Sesame seeds are healthy, so i have added a lot of it

Water - 12 tbsp or as much required to get a thick batter. If the batter is runny it wont coat the bread

Turmeric - 1 large pinch for colour (optional)


method

Place the water, turmeric salt and sugar in a bowl. Stir and gradually add the maida and rice flour until a batter is formed. Add the sesame seeds.

Cut the bread slices into small pieces. I sliced each bread slice into 12 pieces.

Heat oil in a pan. When hot, take each piece of bread, dip it in the batter and fry it in medium heat, turning sides.  Remove from oil when the sides start to brown. Serve warm.

Click here for more Indian Snack Recipes in this blog.


Spicy Brinjal and Potato Stir Fry

Brinjal is one of my favourite vegetables. Growing up in the hillstation Valparai we had our own patch of vegetable garden and we use...