Black Forest Ice Cream Cupcake - Eggless recipe


Hello All,

This is another sinful indulgence, you may like to prepare at home. A very easy recipe with home made iced cream rather than ice cream layered in a soft spongy eggless chocolate cup cake.

the recipe

maida / flour - 75 gms
powdered sugar - 75 gms
cocoa powder - 1 tbsp
baking soda - 1/3 tsp
baking powder - 1/3 tsp

yoghurt - 60 ml
vegetable oil - 30 ml
vanilla essence - 1/2 tsp

paper cupcake moulds - 12 (optional)

ingredients to assemble the cake

whipping cream - 100 ml
powdered sugar - 5 tbsp
vanilla essence - a drop
few chopped cherries
cooking chocolate or chocolate shavings

method

assembling the dry ingredients

Place a sieve on a bowl and sift together flour, sugar, cocoa powder, baking soda and baking powder.

assembling the wet ingredients

Place the yoghurt (beaten), oil and vanilla essence in a bowl.

Preheat oven at 200C. Place paper moulds into muffin tins.

Add the dry ingredient mix into the wet ingredient bowl in 2 portions. Gently stir with a spoon till fully combined.

Pour 1 tbsp of the batter into the prepared moulds or into prepared muffin tins. The batter should be only half of the mould. Bake in the preheated oven at 200C for 10 to 12 minutes. You will get soft and spongy cupcakes as seen below.


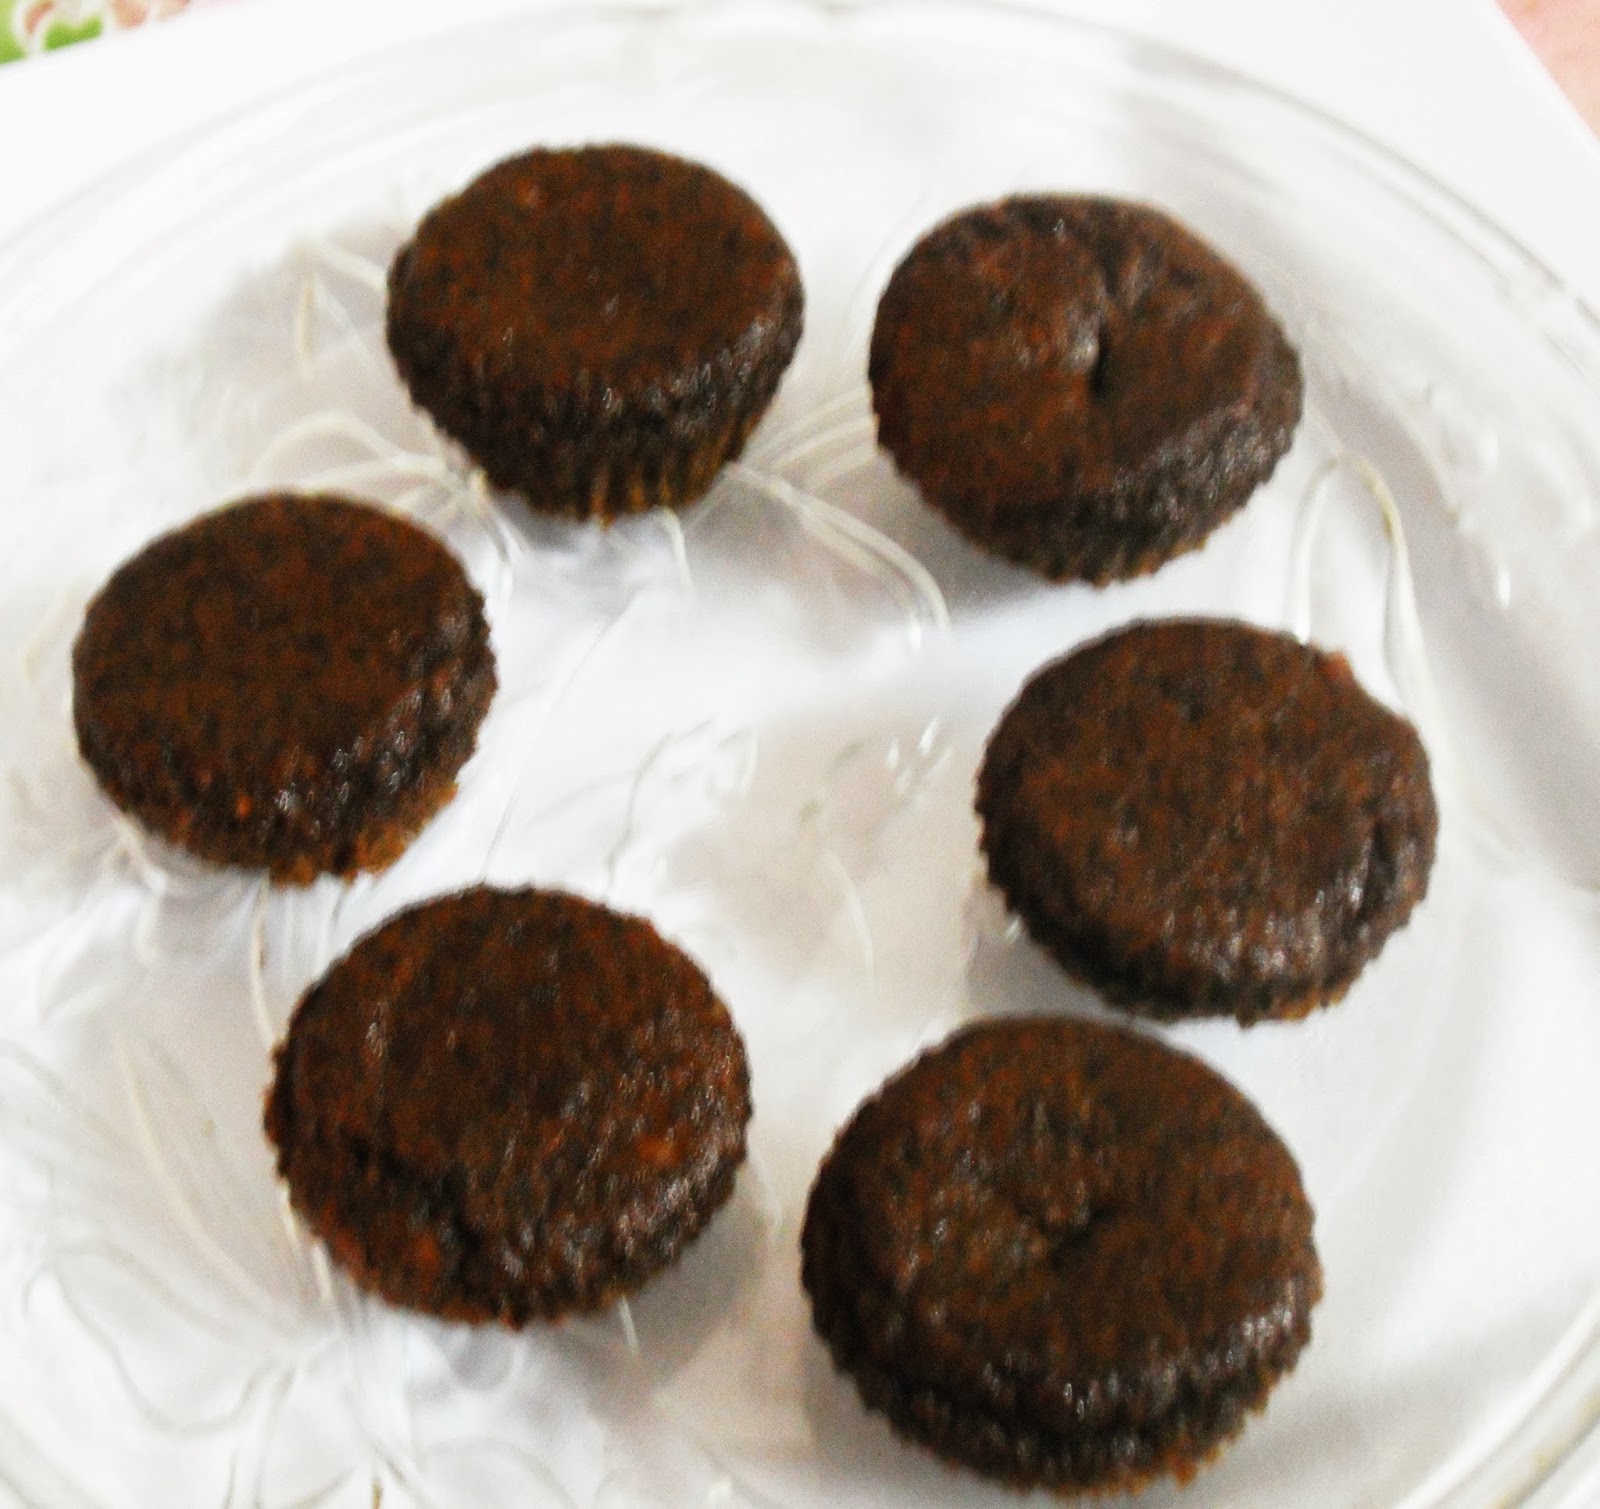
Once the cake has cooled down to room temperature, place it in the refrigerator for at least 12 hours.

To assemble the cake, keep the whipping cream in the refrigerator (dont keep in the freezer). Once cold, use a chilled bowl, chilled balloon whisk to beat the cream. Pour the cream in the bowl and whisk it till soft peaks forms. Drop the one drop of essence and gradually add the powdered sugar. Freeze the mix for about 1 to 2 hours. I could wait only for one hour so the ice cream started running when i placed it on the chilled cake.


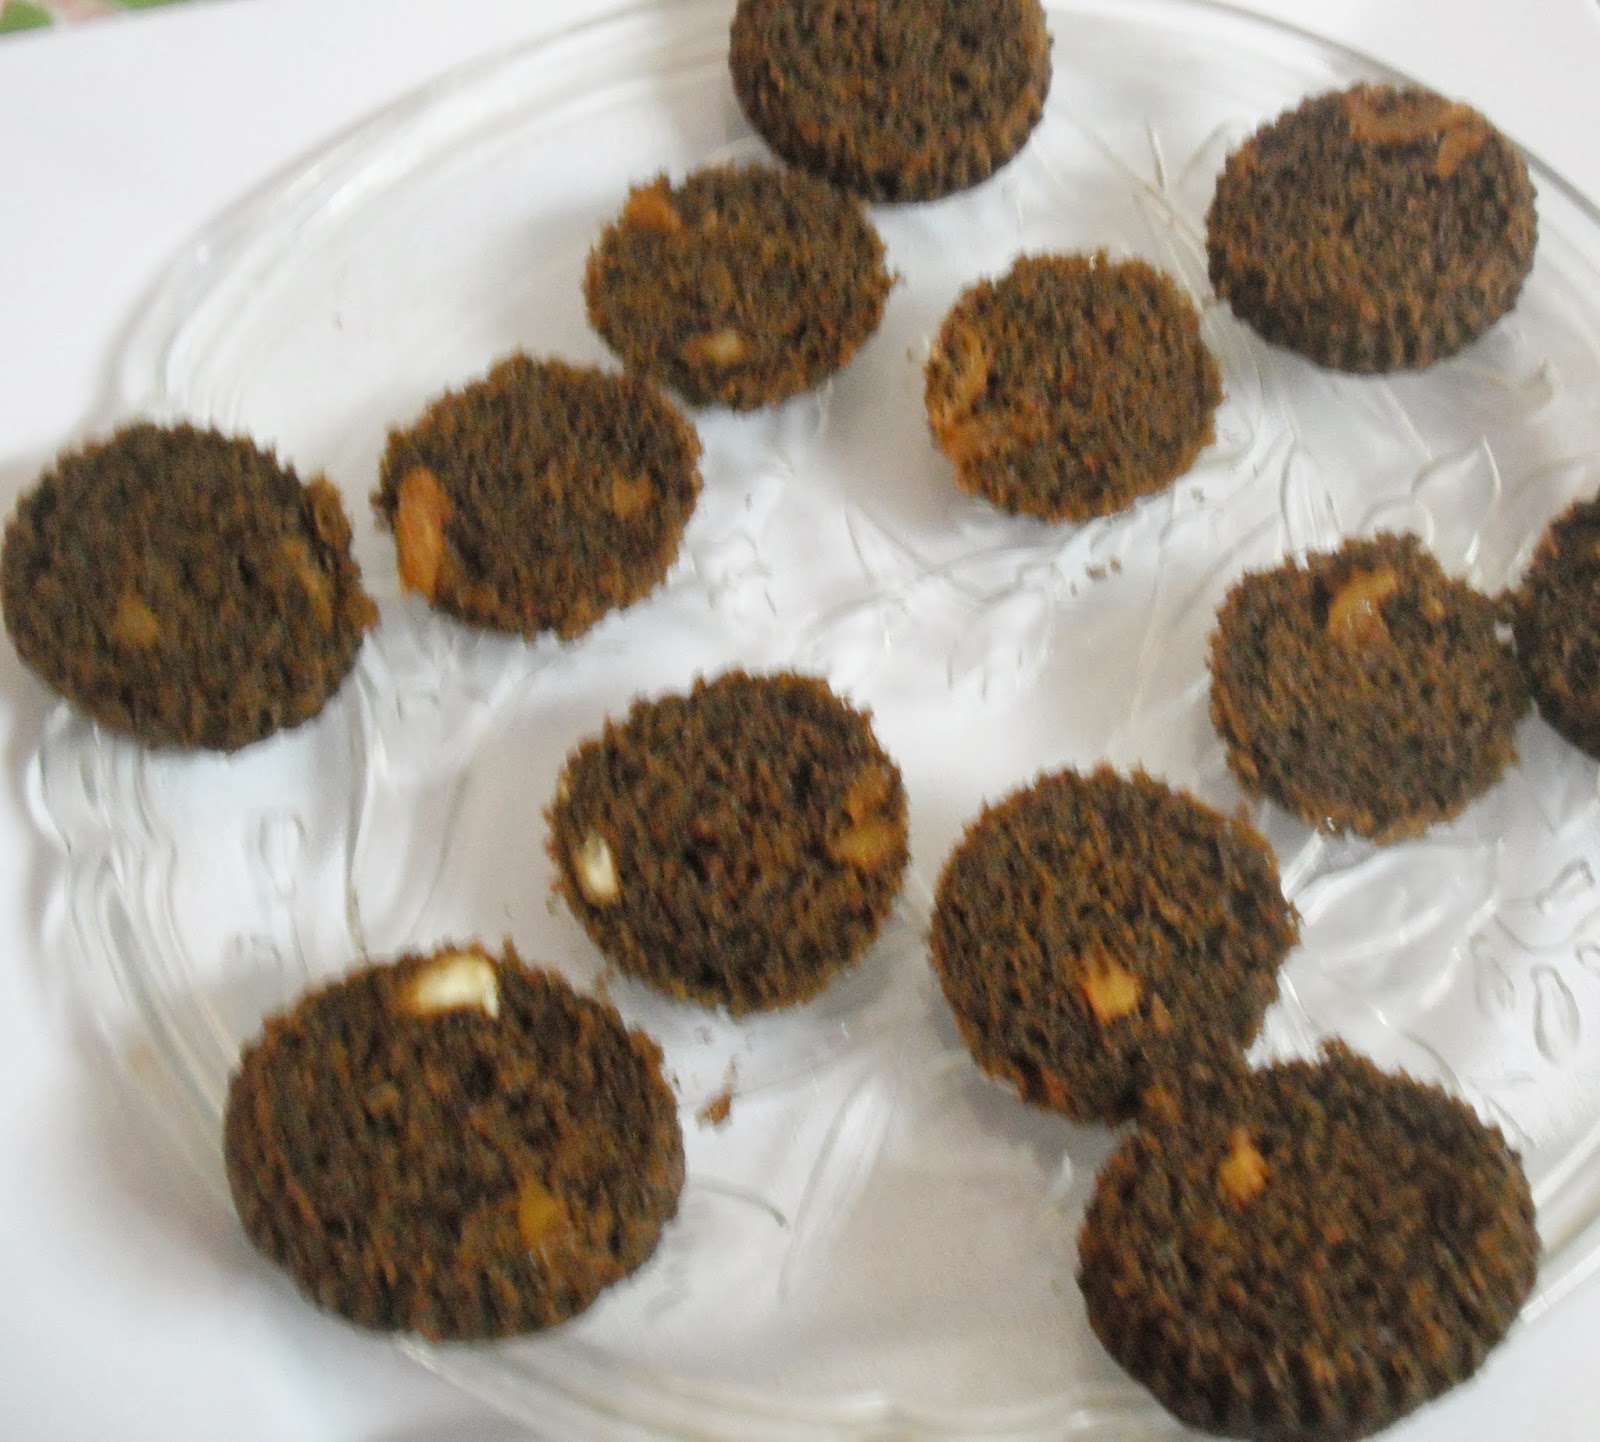
Cut the cupcake into 2 as seen above. I had added some apricots and almonds, because  initially i had no plans to ice this cake.

Place a dollop of ice cream on the lower half of the cake and  place the upper half on top and sprinkle the chopped cherries and then place a big dollop of ice cream on top. Once this is done for all the cupcakes, place it in the freezer for about ten minutes or else it will melt away. Take the cake out and use a peeler to shave the chocolate directly on the black forest ice cream cupcakes. Serve it immediately.

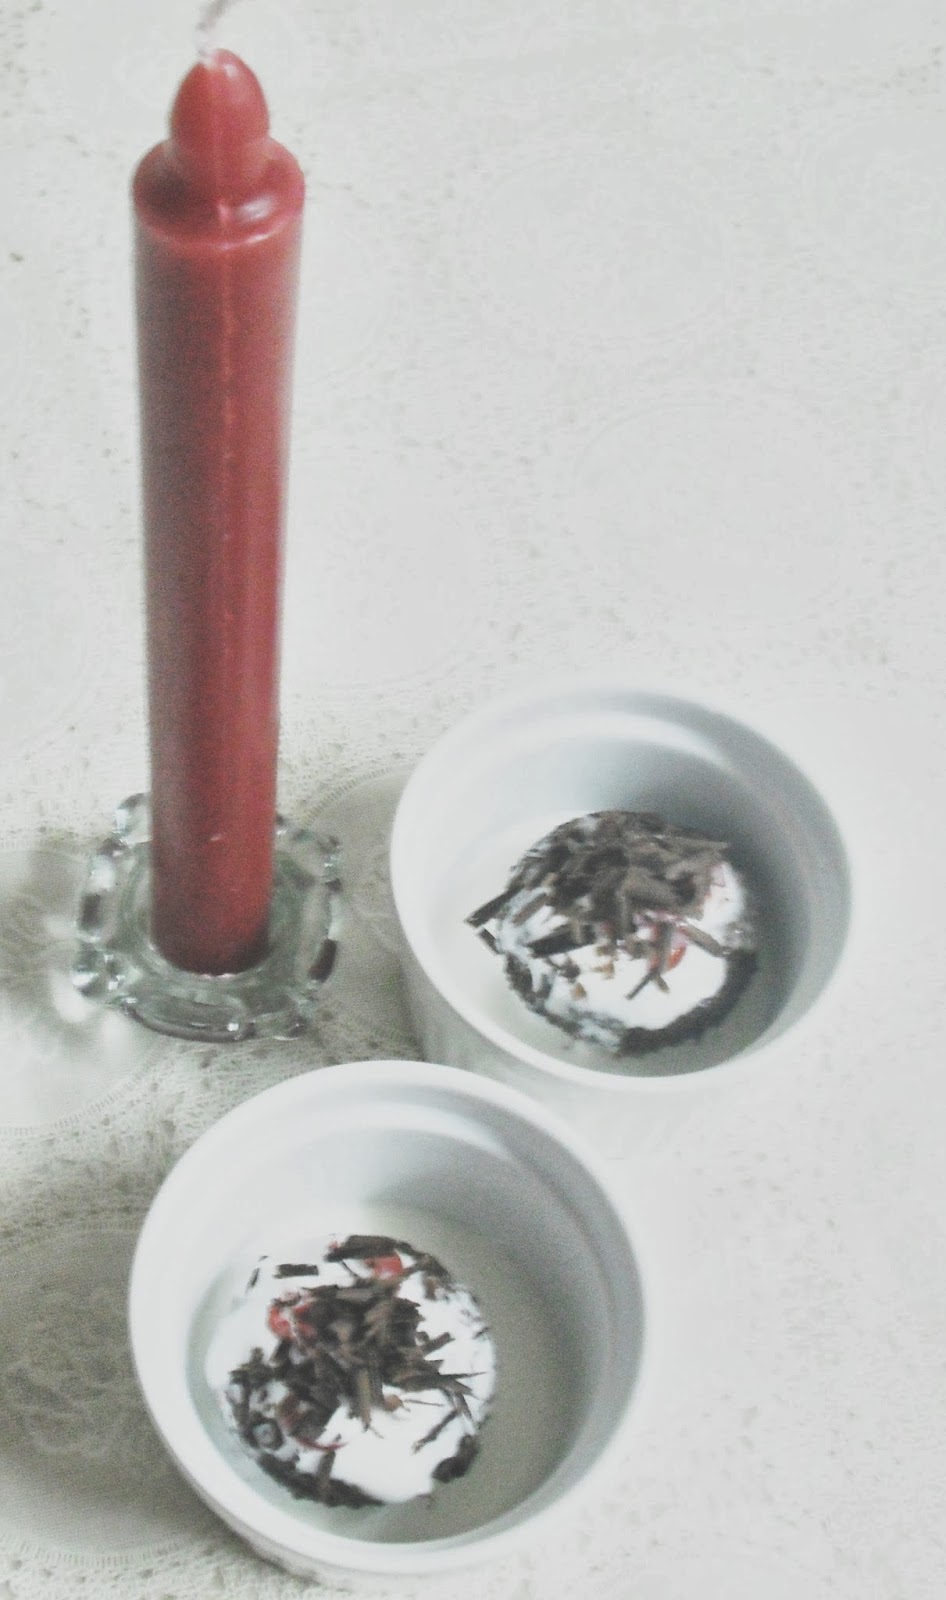
If you like to serve as seen in the first picture above, follow these steps.

Take a serving bowl and place a dollop of ice cream and then place the prepared black forest cupcakes. This would be more interesting because you can get to eat a lot of ice cream along with the cake.

Cheers!

Roasted Pumpkin & Kashmiri Chilly Soup


Roasted pumpkin soup is a very popular one. The twist in this recipe is the addition of red chillies to make it easy for the Indian kitchen. The second reason is the use of thinly sliced pumpkin to speed up the roasting process and thereby save time and power.


ingredients

pumpkin - 500 gm
veg oil or olive oil - 1 tbsp
salt - 1/2 tsp
parmesan or any other meltable cheese - few shavings as seen in the image above
sage leaves or curry leave for garnish
serves - 3
water - 150 ml
whole Kashmiri chillies - 4

Preheat oven at 200C and then place the thinly cut pumpkin placed in a baking pan into the oven. Sprinkle oil and salt.  Pour the water into the tray. Bake for 25 to 35 minutes. Once done, take the pan out of the oven and let it cool down. Scoop the flesh from the skin and place it in a blender. Meanwhile, cut the chillies lengthwise and remove the seed. Cut into more thinner strips. Add half of the chillies into the blender and blend it into a smooth paste. Add water while blending, until you get  a smooth pouring consistency.

Take 3 ramekins or other oven proof soup bowl and pour the soup equally into the three bowls. Grate the cheese on top and place few strips of the chillies. Garnish with sage leaves or curry leaves and place it in the oven at 200C for 3 minutes or until the cheese melts. Serve warm with bread or as such. 

Enjoy.


Orange Caramel Custard | Make in advance Christmas Dessert


ingredients

Milk - 500 ml
Cream - 200 ml
Egg - 4
Sugar - 10 tbsp or to taste - taste after the eggs are added and just before pouring into the mould
Vanilla - 1 tsp

ingredients for the syrup

10 - 14 tbsp depending on the size of the mould to coat it thoroughly, otherwise the custard wont leave the pan after chilling
Orange juice - 4 tbsp


method 

Place the sugar and orange in a sauce pan over low to medium heat. Do not stir. Let the sugar gently caramelize. When the sugar has caramelized, pour it into a pan or mould of your choice and swirl it to coat the bottom of the pan and the sides. Keep it aside.

In the mean time boil milk and reserve. In another pan, heat the cream in a double boiler. When you see bubbles on the side turn off heat and mix it with the milk. Stir till it comes down to room temperature.

In another bowl, whist the eggs with sugar. Add vanilla extract and give a quick whisk.  Add the egg mix into the milk and strain it into another pan.

Pour this into the caramel coated pan and cover it with an aluminium foil or a thin steel or aluminium lid.

There are two ways of making the custard: Steaming or Baking.

Steaming: Prepare a double boiler and place the custard filled pan into it. The water level should be atleast half the height of the pan. Steam for 40 minutes.

Baking: Follow the same method as steaming to prepare the double boiler and place it in the oven at 160C for 45 to 50 minutes.

Once the custard is cooked, let it cool. Then place in a refrigerator for 6 hours or overnight. Invert the custard to see something which looks like the above.

Cut it and serve with the excess syrup.

Mint Pulao | Pressure Cooker Method


This is a very easy rice recipe you can make in Pressure Cooker. Add it to your Christmas Menu.

Ingredients for the mint chutney

A large bunch of mint
1 1/2 inch piece of ginger
6 cloves of garlic
Curd 4 tbsp or Juice of 1 lemon

Ingredients for the pulao

500 gms of Basmati Rice (approximately 4 cups)
1 large onion, sliced
a medium stick of cinnamon
6 cloves
a tbsp of pepper corns
Veg oil - 2 tbsp
Almonds or cashew nuts - as much as you need
Salt to taste
8 cups of water

the method

Wash and soak the rice in water for 15 minutes. Drain it and set aside.

Heat oil in a  pressure cooker and add the onions, cinnamon, cloves, pepper corns and nuts. Meanwhile grind the ingredients for the mint chutney.

When the onion turns translucent, add the mint mix and saute for 10-15 seconds. Add the rice and salt and stir gently. Add the water, give a quick stir and put the lid of the pressure cooker. Let the whistle blow once. Turn off heat. Open the cooker when the pressure is gone. Serve this with potato wedges or a chicken curry or if it a weekday, serve with an omelette.

If you don't like to cook in pressure cooker, cook the rice separately and then season it using the method mentioned above.


Karimeen Pollichathu | Authentic Recipe


Karimeen Pollichathu


Karimeen Pollichathu is a famous fish-dish in Kerala, especially in the areas that have backwaters where pearlspots or karimeen is prevalent. The recipe below is medium spicy, which can be eaten by adults and kids. If you want a spicy version increase the quantity of chilly powder by 1 more teaspoon and the coriander powder by half a teaspoon.

the recipe

Karimeen or other soft fish fillet - 500 gms
salt and turmeric to marinate the fish
Oil to sear the fish

for the gravy

2 Onion or 15 Small onions
2-3 green chillies or 6 bird eye chillies (kanthari mulaku)
6 medium sized garlic cloves

Crush all the above ingredient in a mortar or just blend it in mixie for 5 -7 seconds

3/4 inch ginger - crushed (keep it separately)

turmeric powder - 1/4 tsp
chilly powder - 1 1/2 tsp
coriander powder - 1/2 - 3/4 tsp
pepper powder - 1/2 tsp

tomatoes - 3 medium

salt to taste
thick coconut milk - 125 ml (extracted from half a coconut)
coconut oil - 1 1/2 tbsp
curry leaf - 2 sprigs

Banana Leaf to wrap the fish - 2 , half portions

Method

Marinate the fish with salt and 1/4 tsp turmeric. Fry the fish quickly in Oil. It need not turn crispy. This is only for the protein to get sealed to the skin. Check the image below.


To make the sauce, you can use the oil left over from frying the fish. Heat the oil and add the crushed onion, garlic and chilly. Stir for a minute and add the crushed ginger. Add all the powders and stir for few seconds. Add the tomatoes and salt to taste. Let the tomatoes soften. Check salt and turn off heat.

I like to add the coconut milk into the banana leaf wrap, so that it cooks along with the fish and does not lose flavour from overcooking it...i mean cooking it twice.

Heat the banana leaf over fire. Place it in a pan.

I did not go the contemporary way of wrapping one fish in a parcel. Instead i used a method whereby you can save time.

Once the banana leaf is placed on a wide pan (an Uruli), pour half of the tomato sauce over it and 3/4th of the thick coconut milk, as seen in the picture below.


Place the fish as seen in the picture, place the remaining tomato mixture and drizzle some coconut oil. Place another banana leaf on top.


Customize your batch according to the size of the pan you are using Fold it in a manner that the juices do not run out of the wrap. Place heavy plate or spoon on the leaf. Pour a tablespoon of coconut oil on the side of the wrap. Close the pan / uruli with a lid. Place the pan on the stove and cook it in low flame for 15 minutes.

Once done, be prepared for the nice aroma of coconut milk, coconut oil and the fish pollichathu itself. Open the wrap carefully and serve the fish with rice, palappam or  soft idiyappam.

Karimeen Mappas is another recipe you may like


Ambalapuzha Pal Payasam | Rice Pudding - Pressure Cooker Method


This is one of the easiest payasam recipes; easier than semiya payasam too.. For this payasam aka kheer you can just use the ingredients that are always available in a Kerala pantry. I had seen this recipe first on Asianet during my schooldays and i had tried to memorize the recipe by creating a proportion for the ingredients. It was 1:2:3:4. It should have been 1 cup rice, 2 cup sugar, 3 pods of cardamom and 4 cup milk....but now i am not sure whether the proportion is correct, so there is no proportion measure in this recipe. It was long time ago and there is no online videos of that recipe / cookery show which used to be hosted by two ladies. So, i have arrived at the following recipe and i think the photograph stands testimony that it came out well. As i mentioned, this was an experiment and so the following recipe serves just 4. Multiply it for more...bcoz you wouldn't feel fulfilled with just one dessert bowl full of this.

ingredients

Raw Rice - 75 gms
Milk - 1/2 litre (500 ml )
Sugar -150 - 200 gms
Cardamom - 6 pods
Boiling hot water - 1 cup (this is a part of my experimentation)

method

Soak the rice in hot water for 15 minutes. Meanwhile bring the milk to a boil in a deep pressure cooker. Add the soaked rice with water, sugar and powdered cardamom (you can powder the sugar and cardamom in a mixie - small jar). Stir and let it come to a boil. Place the lid of the cooker and the whistle, and turn the heat to low flame. Let it cook for 25 - 30 minutes. Choose the smallest burner in your stove top so that the payasam cooks slowly. It is better to turn off the cooker after 25 minutes. Serve warm. I like to serve this payasam plain without any fruits and nuts. It is still delicious. 

Rice pudding is not just specific to Kerala or India... There is an Egyptian version of rice pudding too.

Pacha Manga Pachadi | Raw Mango in Curd and Mustard gravy


Mango Pachadi is similar to other pachadis in Kerala cuisine. One difference in this recipe is the addition of chilly powder and turmeric. This is inspired by a hotel en route to Alleppey. We stopped at this restaurant and took away our lunch and in it i found this Mango Pachadi. The one i have tasted at other places are usually white and the mango remains partially raw. I am totally against raw mangoes 'coz my teeth cant stand the sourness...hope atleast some of you would have had that experience while biting into raw mangoes. I have wondered whether it is just psychology or if it really causes that feeling. 

After tasting the fully cooked mango recipe, i tried this and it tasted as good as the restaurant one. I usually prepare all curd based curries in clay pot. Some of the other curd based curries in this blog are ethapazham pulissery, beet root pachadi and pavakka pachadi

ingredients

2 medium sized raw mangoes
1/2 to 3/4 tsp mustard seeds
1/2 tsp cumin seeds
1/3 of a medium coconut
1/4 tsp turmeric
1/2 tsp chilly powder
1 green chilly (optional)
250 ml thick curd
salt to taste

method

Peel the mangoes and cut it into bite size cubes. Place it in a clay pot. Add salt, turmeric, chilly powder and just adequate water to cover the mangoes. Cook it in low flame till almost done. Grind the mustard seeds, cumin, coconut and green chilly to fine paste. Add it to the mangoes and stir well. Beat the curd till soft and add it to the mangoes. Check salt and turn off heat. The curd will cook well with heat from the gravy. Serve with rice and pappadam. This makes a simple and filling meal.

Orange Basbousa | Eggless Semolina Cake


Orange Basbousa


Basbousa can be best described as a dessert of Middle Eastern origin. Yes it is a dessert from a desert. It has variations in each country, especially those near the Mediterranean region and i have attempted to create a recipe of my own by making some variations in the syrup rather than in the cake itself.

This is my second attempt at baking a semolina cake. The first one was a Turkish Pistachio semolina cake. It tasted good but since i reduced the quantity of egg, it was not that soft. So i decided not to change the basbousa recipe and followed the ratio. Since this is the first attempt at basbousa i tried with small portions. The actual syrup recipe has sugar and few drops of lime. But for the syrup i followed the syrup in the Turkish recipe. This is one of the desserts i would call it 'divine'. Sorry for the bad picture above.....i was in a hurry and couldn't make it good diamond shapes, i should have at least cut in squares...


You can keep a ratio of the ingredients, so that you need not write down the recipe all the time. Here the ratio is 200 gms of semolina (rava), 200 gm sugar (in total) and 200 ml liquid (yogurt + oil), 200 mls syrup (100 ml orange juice and 100ml water) ...isnt that easy..

the recipe

ingredients for the cake

fine semolina - 200 gms (you can blend regular rava / semolina in mixie for 5 seconds)
caster sugar - 100 gms
Yogurt  - 100 ml
Vegetable oil - 100 ml (the orginal recipe has 100 gm melted butter)
Vanilla extract - 1 tsp
Baking powder - 3/4 tsp
Rind of 1 orange (optional)
Almonds and pistachios - 1 for each piece

for the syrup

sugar - 100
fresh orange juice - 100 ml
water - 100 ml
rosewater (optional) - 3 drops
Rind of 1 orange

the method

Place the sugar, yogurt, vegetable oil, vanilla and rind of orange in a bowl and mix well until the sugar is fully dissolved. Add the semolina and baking powder and mix well with a spoon or your hand. The mixture will be slightly water. Leave it aside for 30 minutes.

Meanwhile, place all the ingredients for the syrup in a saucepan and bring it to a boil in medium heat. Let it boil for 5 minutes. Turn off heat and let it cool.

Grease a baking tray with butter or oil. Once the semolina mixture has rested for 30 minutes, give a quick mix again and place it in the baking tray and smoothen the top to level it. Cut it into desired shape and place the alomonds on each piece. I sprinkled the pistachios. Bake it at 180C for 30 - 35 minutes until the top of the cake turns golden brown.

Take it out of the oven. Pour the cool syrup on the hot cake. Serve warm. You'll love it. This is totally different from the Indian sooji ka halwa aka Rava Kesari


Rava Kesari


Ribbon Pasta in Mushroom Sauce | Indian Home Style Recipe


Hello everybody, It has been a long time that i wrote a recipe. Well my passion for blogging has not gone, but i just hit a roadblock in terms of writing at my blog, may be because i am writing a lot for my work related contents and i am just off here...i had been taking pictures...a lot of pictures...and i almost forget the recipe. So today i prepared this pasta for brunch....it was actually for breakfast...but the rain in Kochi is making everyone hungry i suppose, kids were around saying the word hungry..oops....i have not heard them say it before and i felt ... i better give them something...at least i can keep them away from my kitchen. So the breakfast was stretched to brunch and i think i cant escape without cooking a lunch too...

I have mentioned in the name of this recipe that it is Indian style. It means, i am not going to add cheese and i am adding milk instead of cream. However in terms of the herbs, i have added fresh basil and rosemary. These are now available in the newly opened Lulu Mall at their hypermarket. However the basil is from my balcony garden. If you cant find fresh rosemary, use dried rosemary. You can find it among dried herbs in supermarket. Two brands which i have used and which i have stocked at home are the ones from Keya and the organic product from Fab India. In Kochi, all these mediterranean herbs are found in a dried format in a shop called Bakers which is adjacent to Padam Cinema Theatre on M.G.Road. The dried ones are also strong enough to impart a nice flavour to the sauce. 

Though i cook a lot of Italian, i have written only a few of them in my blog. So i have decided to post a few more since types of pasta are now available in supermarkets in all parts of the city. Bambino has now come out with Penne pasta, Ribbon pasta, Spaghetti in addition to Macroni and Vermicelli which has already been in the market. Ok then ...so these are the brands and shops from where you can buy all the ingredients. If you want to know how to grow basil in tropical climate, do let me know. This is the basil in my balcony garden.


the recipe 

One 200 gm packet Ribbon Pasta

ingredients for the sauce

One pack Button Mushroom, thinly sliced - Check out below how to clean mushrooms

2 tablespoon vegetable oil (you can add a teaspoon of butter also if you wish)
2 medium onion, sliced
5 cloves of garlic, finely chopped or minced.
1 1/2 to 2 tsp pepper powder
8 cherry tomato or 1 tomato cut into 8 (i have used the latter)
150 ml milk
salt to taste
6-8 basil leaves
a tiny sprig of rosemary (optional)

Method

The sauce and the pasta has to be cooked simultaneously to ensure the continuity of the cooking of pasta.

I  Cook pasta as directed in the packet. But cook only 3/4th of the time, because the rest 1/4th time, the pasta has to cook in the sauce to get that nice consistency and flavour.

II In a wide pan, heat oil and add the onion and garlic. Stir it in low heat till translucent. Add the thinly mushrooms and continue sauteing in low heat. Add 1 1/2 tsp pepper. By this time, the pasta would have completed 3/4th of its cooking time. Drain water from pasta and add it to the sauce (reserve a little bit of the liquid). Gently toss the pan or gently stir it with the sauce. Let it cook for 2 minute. Add salt. Now add the tomato, basil, rosemary and milk and continue to cook in low flame until the sauce is thick. If there is no adequate sauce to cook the pasta add the liquid which has been reserved. Check the consistency and tasty and also if pasta is cooked to soft but not too soft texture and turn off heat. Serve immediately.

How to clean mushrooms

Sprinkle vinegar on the mushroom and sprinkly maida / flour over it. Ensure the mushroom is fully covered with this mix. Let it so for 10 - 15 minutes. Gently rub the top of the mushroom and peel the skin. Start peeling from the bottom of the umbrella. I did not use the stem, because it was hard.

Hope you enjoyed the recipe and all the details...

cheers!!

The recipe goes to My Bowl of Pasta hosted by Jagruti


Spicy Brinjal and Potato Stir Fry

Brinjal is one of my favourite vegetables. Growing up in the hillstation Valparai we had our own patch of vegetable garden and we use...